Overview:
Database Adapter is a partnerlink in BPEL which is used to interact with Database for read, write operations. Using Database Adapter we can perform the following functions.
1.Call a Stored Procedure of Function
2.Perform DML operations like insert, update, delete on a table
3.Perform SELECT operation
4.Execute custom SQL Statements
In this Article I will explain how to create simple synchronous BPEL process containing Database Adapter which will read the data from a table and pass the value to output parameter.
Prerequisites:
1.You need to establish a Database Connection in Connection Navigator before you proceed further. Refer to my previous article on how to create a Database Connection by clicking the following link http://erpschools.com/articles/bpel-olite-database-connection
2.If this is your first BPEL Process I suggest you to go through my hello world article first.
Create Application:
Open JDeveloper and select Applications in the JDeveloper
Right Click on ‘Application’ and select ‘New Application’![](https://lh4.googleusercontent.com/DZ2cBkUtnNPXCYgbbpzxRgVlWeFRTfX11u6CYg1AOEt2H1cXjbu9Px_PSTxRQOXJ75i7Kw22cI0zm_6TXp-oZlXv7JUPqh7pNvcZ7tUMqaFDoQtY96ZrJXqX73WHeQ3Xejk)
![](https://lh6.googleusercontent.com/MEi9h0lANWwjDJGWCogSwX0yFmyh8vA3yx347DxoWBxf0I7szVRzKrSYJG4YA-0ZvGW4lNRPA8G5jNm5K6JP3a2vFWA_UzuE9AuTePYKay2HS8PGHwCcGf0KzTpbBgWXWRw)
Create Application Window opens as show below![](https://lh6.googleusercontent.com/CPZxCV4oImacD5UxiExOfzFQSR7fwM9tTk6Dxw4VW3JS1XR_Z9sZzSzstOoKnR8ZqCq_jYHd9egn_2oSXotOTxMatSvTaOO5HKKBJPBMqFSY8_rSpOm7dJWMmq4XPaXW4Yc)
Change the Application Name to ‘DatabaseAdapterTutorial’
Leave remaining fields with default values and click OK![](https://lh4.googleusercontent.com/XqTOv-psDd_AyLPgA4_sACzyphgK8proPD72c2lM1L-SyMpPVuAIe6fWOY5ZB2RXs2KykmLeJt8KeUJ_EBL6VbaW4T7nTMq3KLxaz0kXCn2IjQbeOxuOUq1DB-98nqa_yKk)
Click Cancel not the OK button
Create Process
Right click on the DatabaseAdapterTutorial and click New Project as show below![](https://lh5.googleusercontent.com/ET-UFUv-IXKJw_vyNOLPUuv69YjRMLG8-wBgnR7JnYK6h_F4cTBaX7U9RQi_u2HgGpX5w8h3ws6VDcjTkNRq8USsLSFaIkYV_xBxjMj-vG1MgjbDjDK1ouC99_plRDV_D80)
Select ‘BPEL Process Project’ from the projects list![](https://lh4.googleusercontent.com/mCttONwW5-hZ-RTjc7FCX7Ti9aI7FtPh_UnsXyFTZq-6_3Ft06UtF86R9l1X8gjhrchPENLfeNgJrquWTI72Sy8yxtprvSkWspSbsAaBISZN0mfNqCk-fkEsJS2St5eY-90)
Click Ok
Chang the Name which is optional and change the Template to Synchronous BPEL Process as shown below.![](https://lh3.googleusercontent.com/AnUlv0DVpZj053AS8LUXNdTWCa4p4631hQCmNcLJW0pb8gk_4uEDZge2LHsV45HHd3DSAuvQC5INhTp35C2PJ_HKcCh0hofngT62QIRPFPUCmEgZ86D327LZGowjfMhggWk)
Click Next![](https://lh6.googleusercontent.com/eTJaWiZXsK96kagxZQgoApLXZ18IhZ-TuNVcugr_0DMO8PM7Midm3dmQ5TogVMI4ufLnPUqkAVOv_Ac5b8Mi24UXq2USSgO9Csj31pYSKoF6aBLkWS6VEujUZ-OKuiiVAdg)
Leave the default values and click Finish
DatabaseAdapterTutorial Shows up in the Applications Navigator![](https://lh6.googleusercontent.com/Cmvuk5dlT55RxLJA5uDzcCWJroZN10g85br-a_0GxvfAiEtIZVSpchDuFYQ-5uO4izMh9XF-3dW1_vo7OMy5LMGIBOHuArMQ0d9YQdwd3IPwcR7WYuGykgZ5rKVO9Y6DbIw)
On the right side of the jdeveloper window select ‘Services’ in the component Palette dropdown box.![](https://lh6.googleusercontent.com/QQtl1qGNTw4cTIeJ2DXHMa46unMuCyUxfj2lAC2h8Ji4hfkTCUzCOSuOh8Uz5LlDYPwu9Bhb0DoHCiNREqdR2qyYGJRsbNQ9wucbrPB15UVhOWVuxOXP6ZlSdC9CS4nketg)
Select the Database Adapter and Drag it to right side Services portion of jdeveloper main window![](https://lh3.googleusercontent.com/MlxHgRbr_eUwmonMkGCG6sj42QOZK_NbhdcHt-TA51eZpzIpgXKy_0Z3vytRbfSOJWitO1wbStj-d_I53q7VJgBMvBPYbJTNIDkyCZBVemU8oHAdZ907wTX2rKL8e3EGDrs)
Adapter Configuration Wizard screen will pop up as below![](https://lh6.googleusercontent.com/xIhLdfQmIJij8hex-mOEgFmufwJDbZzxdTpukZlynzI3dITi13n9CPCY4_QxXBKV4TNIYTsimnnN-MQl_V-HWirGmGolOlUQFZFDn4vTi1yJfHF8BccTuqv9tTfr_0ZFVzI)
Click Next![](https://lh4.googleusercontent.com/BvfKtw70NV6AQBIckTtLS02QJXDvK76FWJd0FGqCnQN6jW4DNGwk6d_iW3HjIDCat2VnsO2WiHjHe20T-wIt3wOP4TF_YcmJ-6wDp0ptWWY_SS_L8xyOqaa5f8QMZTJ3KPs)
Enter the Service Name as ‘FetchEmail’
Description field is optional
Click Next![](https://lh3.googleusercontent.com/ca0WrA-SKX1KuuIhv6f0cv53TW-BWdnISwiPj8TRwggdAnU9C-uWALKU_VpoUqm8V1s6XdpsgtglQXmXTrdbCXz1Nnx_N1SqiUYLUK18DDprvzvx8X1-mkSaELT2tCGDW-U)
Select the Database Connection ‘BPELOlite’ from the Connection list. This connection varies as you create Database connections in Connection Navigator
Leave the JNDI Name with default value and click next![](https://lh3.googleusercontent.com/PuFe9_7NutLU54ICu-_NlnZg_blZ5SnXVpgJxUgIDMvkaVOoU2jNrrzi__O1CiSRbmL87FJMbIne__cWR_20HlRcevFmvs4EkaYskPa5_xCHFCIvkjmn4IjInQh1sQDH07M)
Select ‘Perform an Operation on a Table’ option from the list
check Only ‘SELECT’ checkbox![](https://lh4.googleusercontent.com/REeWWyjGSSArz_VTFWCTw6Dq6T8pr1pu6T_wtk44qY2SW4SXr0KGyakvorEvBnwwTswuxp5V_ZyMNTNDdhLcvBTyyidV614hJsUGIb-pJ5IYHXzf97d8gnTXZWXObESIb2w)
Click Next![](https://lh4.googleusercontent.com/PaD_z2mzv5GKoghCkdxkIf0jRfUiHu2AHQl69_ICLaeBb136hTXR2O2XE57eK14BkELKAGhbWoHy8gD1t7qGyHIh7zOHpn7c8WBuI-EMU4_-hdiNHjoS4fcJRUS8Z759Of0)
Click on Import Tables button![](https://lh5.googleusercontent.com/UlBMkL61k8C2npU_kuVNKnUO_yXOzxqbblhj43-KP3HxD_Qo_Z8CYJOb2V9vkgmiGz70zbb7sfPfmyYr89kwcJnvstvOtEoDESPK66oGPnEre1DCTXEL-zmqKNGwVbNMTEk)
Click on the Query button to see the list of tables available in your database![](https://lh5.googleusercontent.com/sc6rXuEdDaOLBYa7carvxSXetgdBdUJeyQgivHqJb96J-S0mItBdNHbCYdBOevk-VP3N9kTKMAgK23bVsFUM-S5D4Z1K_BqOuFZGo8Gpm2vDSWR_fEU8Q07Er1VGu3GxktM)
Select the Table name from the list on which you want to operate the select command![](https://lh6.googleusercontent.com/8eHNrlNwq_hMo9zIaSiDyFYxm1QK3vXZXdD8zLZiYfD1xwAxbqFV6WyxLPk75f27U-M-uPPQNmkqllRhcgJJ6CWNXtlizfc8ORMfVJeeCO_e0_y72RoqeurLJHr6fedwqRs)
I have selected the table ERPSCHOOLS. I am listing the commands below to create the table ERPSCHOOLS if you want to use
Now Click Ok![](https://lh4.googleusercontent.com/LK7RSu7HlCrr8qZsvme8wNpL7Je47CNcZ5B7snFOQdH3nZhoCQQp3RWWplyECptcDcc100jzxSFciQJo3-twCWNv0hW4Gjxr1nFRkpn1msTxUQNvXmUkHn11OdWZfQO9JBo)
Click Next![](https://lh4.googleusercontent.com/41iBHRbG7RaxEFYt9JEic33T-x-8FAZSA1ZzlQUk8_-O8IHkm7ispvyr_26g8VwdU_5QLMAQVDlNobImJWDd6xbJYqMkNceNptNcrVDB6Qy6QIPP-VSW1pfUOyUKUVneouw)
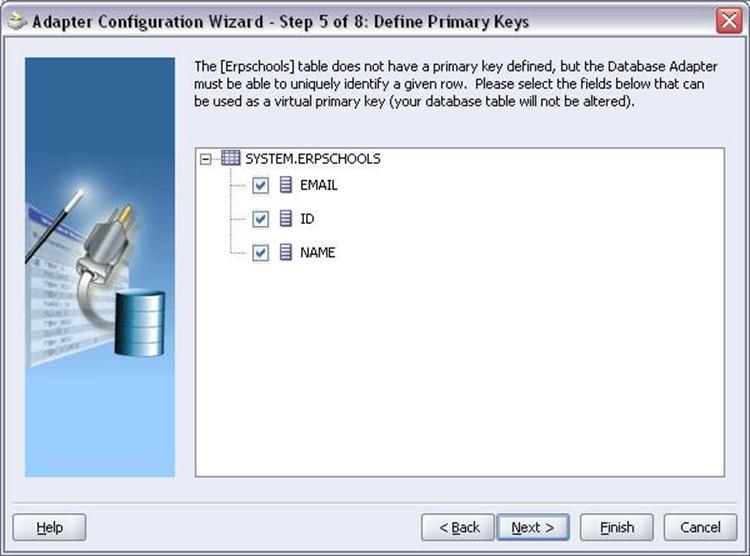
Select all columns and click Next![](https://lh5.googleusercontent.com/00eq0z5TZ7Ax7pz3HRVGfAV9VqgYN_lw1BcQdDW2h0l6wgSjMZTrKLmxC_Yp86BBcdGCIi4fLBk4dvVIjd89xbgyVK3JwttXTOXrzP2M9OgZea2hInXAyNf6x0Eh1EJoJ2U)
I am not creating any relationship with this table so just click Next button![](https://lh6.googleusercontent.com/mjdHcREGOt-o3G4TgN6RiE-lRpgehadfGckwxAe9Ur4cDryNBM4GlMeyc10q88kZNyoFxWw_0m1wDbw1y9hry6hxiPAiYaGZ-edvzgOBX_u1_afVA4n-wwk3Gmw86ue5P9Y)
Click Next![](https://lh5.googleusercontent.com/8fdG3paQQDpCtsHc22zIe540YL3N9jZ4XwZzPNLhE0-KS-4mtTCXHrYllPdgToywV7zFUwGMm1vWDS7PU-3CxidtZ9GRUXvz1L3klTT7BR4VHIEqWyVh7f0sNZ2xhzizrPk)
SELECT command is shown in SQL box. If you want to add any parameters to the query you can add it here. You can also directly edit your SQL statement. I am changing my SQL statement to fetch only one record.![](https://lh4.googleusercontent.com/K_pF8y0yqJlggXqQGnAblbLcN6CecDYwzmc7Hi81PQujLFRCO2C1COVEZainNarPl1HGQgDHSF33LIpoD5HpJYpf6sn1eHMlmetBn59QRa7NFux28eVLTao880CCbL-nq4g)
Click Next![](https://lh5.googleusercontent.com/k_iS0vX1-hNCJOeTzN4ARyl9O_XUnPlqHtV_ghovFT8FnlDxlk3k4UyF9wiX-Yxk4YD_hLJ6DhrhnnP3zlsmzHS3KAHapnr6t8yusWk7dXIyRdFUrdCfVhEDTuYf84WR6_U)
Click Finish
Create Partner link will pop up as shown below![](https://lh3.googleusercontent.com/-U-f1OnzTmYPfbqGkhEMoRHDdr1fO1xBv5a_vGZuR4B9OHV7O325JsZHtRCcn9H7lpylOsV8eniYQLlS831ceaquEdDDhg2Yr6eWTjqaC-XuXkrpwGteEi-AZpoXh-DkugI)
Leave all fields with default values and click OK
Now your BPEL main window screen should look like the below screen![](https://lh4.googleusercontent.com/KJZFxYpmlPCaUDDUIJM5Ov7XV9TKsEFXUHdRPf6Xk6IQRVld-8LI6dD6SFrj9gr58LLmB-CwzJjijJmtvtiBMgmIXWHFhA9F3vBbBbrYSfqiuQCv6mtffRbOHbeT-_0M550)
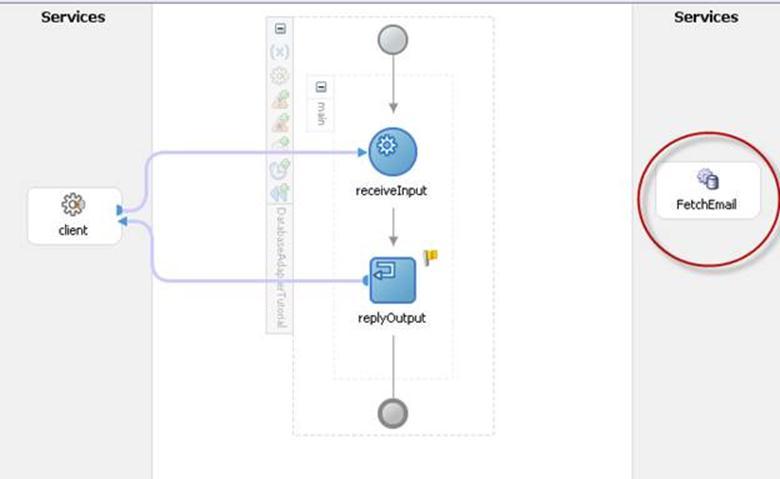
Fetch email partner link/Database Adapter will show in Service area as shown in the red circle.
Now select ‘Process Activities’ in the Component Palette![](https://lh4.googleusercontent.com/gb2hgC0rub0SWnOfglY7e3ZaPJ9VPg2poTRbmmc9Qxdzgh1PfSpH13CHrRGb4jc-7pF5y90cJaGzNhwJutj6a5Dpv-uadpDH9BfF-ZozCFKcrYReiu1yvczvQVlX6shYnO8)
Select and Drag the Invoke activity below the receiveInput activity![](https://lh5.googleusercontent.com/sdT4UMLaqDlVoLQvpsHJgqlFv_DjqO3IRQ0_MXnNovsdGygypTecTt4mm1Bajl7WKOcDjQVTGVOVMkrl0wcOjj5-udP5n-X9XxO9zavyHdLfrljFtLiBMNMW0t8r80yYNrk)
Double click the Invoke_1 activity![](https://lh4.googleusercontent.com/I-sO-yILURsAlJI4tL1LuzzISjjktl8MiqTFqOCk4vjWggJXZCa_XFDPYkeqXi1ZoLGIHkC7_thXu9uPGJRxxTJa8UJbE51njxSf6XGH7FYpEpt3UVfr8p_BErGJhZxJC9g)
Change the Name to Invoke_FetchEmail
Click on the Flashlight right to Partner Link Field![](https://lh3.googleusercontent.com/o9ZnKlPrAbg6aPhTXow4x4_y1Bsfw-S2255xxIrAKHX8tzXnsGVIBQiSMeZZzNaQ9rq-wYwHH9650rKhm23gu1H-VYuyIxwn-DtAHVVcWAVpmS1NqfWHhTDyfR9Kid5mJaY)
![](https://lh5.googleusercontent.com/iT8mFfzRC9GM75Ya5RGohkRQZS7aiEapYdj5bC669QaxVmFj2_h3-5VFcMXBAR2PH5RXndoSm3hHgQLN-bq46Lwm0Q7rAlM3S7KxySPRF_GfrQO5MWULNj_-o8XmIm4JfGI)
Select FetchEmail and click OK![](https://lh5.googleusercontent.com/7769IOvxoTO4UtltKSsVNHucL6qE63of3qNs1CTGKKyJsIgj3tStwB2VPgK0L54ShkHGSbuGNNbfy5bzcRVq3FIVT1-jEtnPU_PXMBp9z2i5CviJUg20iUE2U2uTLRK5Ku4)
Partner Link and Operation fields are populated automatically
Click on the Create Variable fields right to both input and output Variables![](https://lh3.googleusercontent.com/rW-d8nBxoSZBAJ_Lvk49BqfXAOiRinBqMjqaeAXGFkw46EWEWmuXGfLtORMqTbCxQ8M4ep5QKsn3l7Vzfenro2B3WIJIFtqTzuBTM_Ez19ppLLuBmtz5y0Oenx_3LyFS4DM)
Click the small red circle icon, create variable window will pop up as shown below![](https://lh5.googleusercontent.com/j_klVq_kWN3aNgedlsTD7Otp9UDTUGsAqYCS0R3rwcRXD0hUZqQvOkn7h4MNOwiFJf5JT4dwZVrMoFnWUKmSD38Bqy5nrIv0tflA2iyGT3AjDIAX5J8W30UKZdr4yOWerL8)
Click Ok![](https://lh6.googleusercontent.com/_pPTEKOCKhY6joSOarBmMpYc0bAEdJPxjMqSGGLU0iVhUY6crKttesTJZFLDFEok_lhhAS3fAZHbGRWp5foTApfCjk7z8PP42kj2RnzaenbP-gnVxP4IqbQOmMPSp03mpX0)
Now click on red circle icon right to output variable![](https://lh5.googleusercontent.com/Mw4LtlcAQkiLPT9erqgaG_HqK6LzN0e9n6VmKcbVfiRUl8ibp8nNIMRhL_Rfn7gsxKWhC-rILa4wJ65Vq-CHZGKs3rHotqFOCCAq4SxjSgy2_bpCnW24aPg-pYHa77nihBE)
Click Ok![](https://lh5.googleusercontent.com/uC4jXZFo0hw_jGE3DofT5kcm-YFaqgURbCh6y4hCsaPRYnQ8s-dyjDX5cuCoYS4TrsNyUGdp5sGJvDG8ElLJysmihAb2-w1pJ7-Y7LIeW37UYvg8JVN0tqqmMnj5uTPmCSc)
Click Apply![](https://lh5.googleusercontent.com/4X4jPaz-a5ym-DkQ36fZCG-UxMXgJ0fCaXkH8RrPVbTUq3xYm7J8dKQFC0eZ42wwVlaVNfLEO4brg5Ib5N0M3uE0J43WYfdmAtUENn3KtFB85UHQToLGjWoyAenzxWdvf6k)
If you have everything correctly you should not see the errors in the red circle show in the above figure.
If you don’t have any errors click OK![](https://lh6.googleusercontent.com/8TqXlr_5a--qdmCVx8Mk4sYaP2crf9Dk0FPGlHfRxvFcOTH9tK-I247yAE_RXgeSxOb4PoMhV9-ls5n226P0cTb1qmb71sDY0UsI5Roqd0a5MfOX6BD3XODC5-QwUZge-8Y)
Main screen should look like the above picture.
We have created the Invoke activity which will call Database Adapter(FetchEmail) and Database Adapter will query the table ERPSCHOOLS and fetches email field value. Now to catch the value fetched by Database Adapter use Assign Activity, which will transfer the value of email field fetched by Database Adapter to replyOutput field.
Drag the Assign activity from the component palette to mainwindow below the Invoke_FetchEmail activity.![](https://lh6.googleusercontent.com/dUeoUlG3VJDZGRyWlxOX9jlLpZa9qPSlZUsBbObC9Y1yEfcAEN3GB-o3S-48k5yJZt8Hc3SdUJ41kRA1f2AFkH2TLxBaexe6S-MwnX5gd8zk8OMNMy4O5DU6lHOIOpDAwO4)
Double click on Assign_1 activity to open the Assign properties window![](https://lh5.googleusercontent.com/1ZclRGHB80NxrNjIose5YGlQ_4_1wxWVBbbEQZ-aPNaYPu2n1jzop57SRjB6ydbEZzJmkvxKCZPhyvMKC4TgwvTKTVjXYhNvayV9kUhLiVTmHdAYYFGG_LJkuZj2ssazlWo)
Chang the name to Assign_Email and click on the second tab ‘Copy Operation’![](https://lh3.googleusercontent.com/LblZ_t2gcBCj_T0tCMe_is8a00Rp8w7taoroPXR5sFWcg2KXw8p0CCMhMake2sElE6u6AK8xOYnwppOi70CelqsvwRSggXupT_-Q1Sl2EKxd7Q3HHCS30VYxAgR2N4DbpKI)
Click Create button circled above and select ‘Copy Operation’ to open the Create Copy Operation window as show below![](https://lh5.googleusercontent.com/56LZa0KxP7gGYSgzzcuZSKVOKN6mL38wiWxZRBw8SYJBcS1sG55jRDvnCfcNQ93l0gT5XFm29dLNBkHFMm0HQ7W2Cr75Ha6CNrNwkgQJWYP11VwbbctUpYD96YbKJHCBqtU)
Select ns2:email on the left and client:result on the right side as show below![](https://lh3.googleusercontent.com/blvks2M1msgSJiOyO_AbBDznKmdmM4RCb8GEUGwMThy3WFffI3NLtUIoz02wX2maUPh79pRFoeRfWseKcpEw9QGEEI8N4rheUDQ_klV6ZFH9It5VSxWzuyUSJgum6o8Nybc)
Click OK![](https://lh5.googleusercontent.com/i73uhsOrLffqjiAxO_UXEZaAPCL2_RSGsquiDi9B6VyehvMp15gLYYmdn_e3ubqHHIu0TwKiDpcdU1CwVFrFSae-Qfb6w9ORSv2b8Z16KbziqVddCs9XDD70M8K8PhyzUCg)
Click Apply to remove the errors![](https://lh3.googleusercontent.com/qZQ4eEZwB0MNWyBfY4cPWRxvrj0-53dERHrny1tenBkV2HbErsuDRDs0H7GkceJt9-TndZaXhUprxH5W9EKaOvBvKZXCa3CrttQi3OHCPXr2OLIUP9N9PJ-wun9srbk5BLE)
Click Ok
Save your project by clicking CTRL+S
DEPLOY BPEL Process
Now we are ready to deploy the process, Start your SOA Suite and deploy the process
If you are not familiar with deploy process follow the link to see how to deploy the process![](https://lh6.googleusercontent.com/RvT7fa3u--VgLtQEdDvY4rl-SHs0RYC5Mmlrylp4Xyq6V3s3N2iH3LLFIGkCc1yMFeNuJ_eZL9GX0Lm_AkowK869a3cZJy9UPqLCSuCgiNquWqekNSit-c7GO8da9ym80gk)
After you deploy your process successfully your Apache Ant log will show like this![](https://lh4.googleusercontent.com/eYMfQ0ezp7X9FZjkyWpCUC5cSEXXwdym15HSo7_3qs0SasYvjuEebycfdJTQhIPNUwpWQYsf2azBVeGvPMZw_R8xkbc0hKE-cpSs6IBcOU4YW1r4pW4NtJdC1fwQfTg5eNA)
Run the BPEL Process
Go to your BPEL Console
http://localhost:8888/BPELConsole
login in with oc4jadmin/welcome1 (default values)
Once you login to console you can see ‘DatabaseAdapterTutorial’ project in the Deployed BPEL Processes list.![](https://lh3.googleusercontent.com/njYj5q0CWJF5YmUSQbskZytrdth7j07vWxabFiAa6X038KQrCGdwQ-ElNBnPKg4ZiZt_XwtN-nSkkpkFCwkf1G6vNwQfCmCQfAhksOtIC4FQzswW7jR6cP-PUa_Ox2Sz99o)
Click on DatabaseAdapterTutorial
The initiate screen will show up![](https://lh6.googleusercontent.com/-xOKp7Vq_kRBGOrgPNXXAe2hLDW3EIOR9JVaIKAp--K4nMK72be6NF8Ef6dnWTKcmLKkbYv1_MNmzKxeM5-_U1VtfzciTleL6JTAoj2Jdyz2J0yRy6WuCgzqz31NLGcZa98)
Click on Post XML Message![](https://lh3.googleusercontent.com/9QdXLc8P60FkwMR5S2Fi9zKCG3Wz1mNoLLHeOavEXpSgbyuzBpK8DpiszVH5jes0CwYsUMhXrmF41VS22kWRjJkEhej612EAIF4sCIVMt-El9g1MUsNsZ7QD7pvtK-fyHIA)
Click on Visual Flow![](https://lh4.googleusercontent.com/cz24qrc5W1TgJpnpDG24Ddsxvh7z9W_q8ujeMWQUYuNh4Gv7rwpM12sZR6oZFLZ_5HLHdyCui7rUIDzNP6_EJrSqWue8yLfGqkF-gAh3S8x_dG6pxbP6-Q4hr3pvVLxzJGM)
Click on Assign_Email activity to see the output![](https://lh4.googleusercontent.com/CosrRqi4A9Is6okoDkengckwP3CufI1pTBj_cdgv5CvHN31JLUA4Bt4FPWN_lT9Swime0-Kkfe-BTtRdafhDIeIliYcnucy4mc3S1T3KpIcECCs7wWnrx1xr5Or9grihl9A)
The result field contains prudhvi@erpschools.com which is my output.
No comments :
Post a Comment